
You do not need a five-figure Hollywood grip truck to capture rich, moody visuals. Achieving cinematic lighting on a budget comes down to controlling contrast, positioning your sources intentionally, and shaping shadows rather than blasting your set with raw light. By mastering the classic three-point setup with accessible gear, you can immediately separate your subject from drab backgrounds and turn flat footage into an engaging, textured film frame.
Independent creators often waste money upgrading camera sensors when their real bottleneck is poor illumination. A basic camera paired with deliberate lighting will outshine an expensive cinema rig trapped under flat ceiling bulbs every single time.
Why Three-Point Lighting Shapes Professional Depth
Three-point lighting remains the foundational blueprint of visual storytelling because it mimics how the human eye registers three-dimensional forms. When you illuminate a scene using only ambient room light or a single camera-mounted lamp, faces appear two-dimensional and skin loses organic texture.
Structured lighting divides the visual task into three distinct roles: the key light, the fill light, and the backlight (or hair light). Working with these separate elements allows you to dictate the exact contrast ratio of your shot. If you are learning how to turn your ideas into videos, mastering this physical spatial control ensures your dynamic b-roll and speaking sequences look cohesive before you ever open an edit timeline.
Controlling light direction also saves immense time in post-production. Balanced capture means you spend less effort fixing muddy skin tones and noisy shadow artifacts during color grading passes.
Mastering Cinematic Lighting on a Budget: The Three-Point Blueprint
1. The Key Light: Setting Your Exposure and Mood
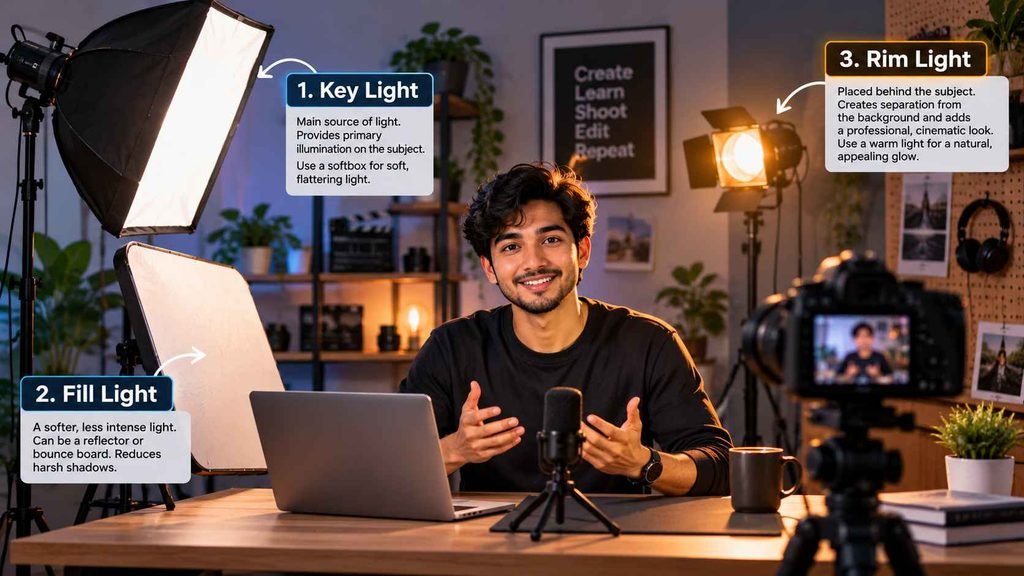
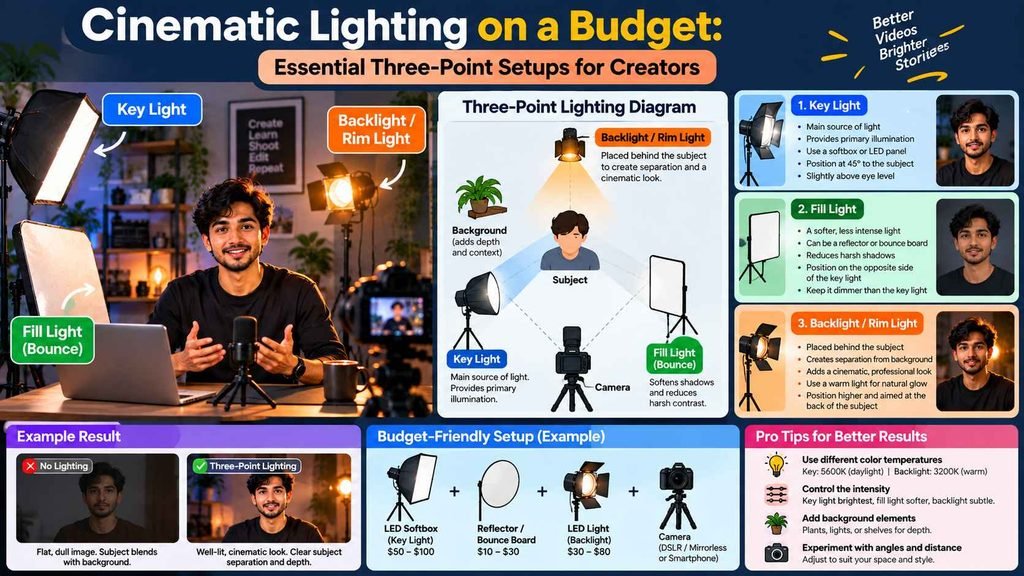
The key light acts as your primary illuminator, establishing the overall exposure and driving the scene’s emotional tone. Place your key roughly 45 degrees to the side of your talent and 45 degrees above eye level, angled downward. This angle creates natural downward shadows along the jawline and casts a subtle triangle of light on the opposite cheek—a timeless cinematic technique known as Rembrandt lighting.
For budget-conscious creators, affordable 60-watt or 100-watt continuous COB (chip-on-board) LED lights paired with a 35-inch parabolic softbox deliver flattering, diffused light. Diffusion is critical: the broader the light source relative to your subject, the softer the transition between highlight and shadow.
2. The Fill Light: Dialing In Contrast and Shadow Detail
Your fill light sits on the opposite side of the camera from the key, softening harsh shadows without wiping them out entirely. The secret to cinematic style lies in preserving the shadow side of the face; flooding both cheeks equally results in a sterile, corporate look.
You do not need a secondary powered lamp to build an effective fill. An inexpensive white foam-core board or 5-in-1 collapsible reflector placed on the shadow side bounces residual key light back into the subject’s face. If you want a moody, high-contrast aesthetic, swap the white reflector for a piece of black poster board to absorb ambient bounce and create negative fill.
3. The Backlight: Carving Subject Separation
The backlight, often called a rim or hair light, hangs behind the subject, angled down toward the shoulders and hair. Its primary job is optical separation, creating a thin outline of highlight that pulls your talent away from dark backgrounds.
To keep your setup compact, use a miniature handheld tube light or pocket bi-color LED hidden just out of frame. Warming up your backlight to 3200K (tungsten) while keeping your key light at 5600K (daylight) introduces subtle color contrast that adds production value without spending an extra dollar.

Comparing Budget Three-Point Lighting Configurations
| Setup Style | Key Hardware | Fill Technique | Separation / Rim | Aesthetic Character | Ideal Production Use |
| The Minimalist Bounce | 60W LED + Lantern Softbox | White Foam Core Bounce | Natural Window Edge | Soft, naturalistic, airy | YouTube talking head, interviews |
| The Dramatic Chiaroscuro | 100W COB LED + Grid Softbox | Black Flag (Negative Fill) | Compact RGB Tube Light | High-contrast, moody, edgy | Film essays, narrative scenes |
| The Daylight Hybrid | Large Diffused Window | 30W LED Panel | Warm Practical Desk Lamp | Organic, warm, lifestyle | Vlogs, casual courses, tutorials |
| The Dual-Point Mobile | Bi-Color Ring / Mini Panel | Silver Reflector Card | Ceiling Downlight Flagged | Clean, balanced, compact | Short-form TikToks, quick reels |
Low-Cost Hacks for Cinematic Visual Quality
High-end cinematography relies heavily on light control rather than sheer lamp power. You can elevate cheap fixtures using simple studio hacks:
- Grid Your Softboxes: Adding a fabric honeycomb grid to your key light softbox restricts spill, preventing light from splashing across walls and keeping the background pleasantly dark. [EXTERNAL LINK PLACEHOLDER: Principles of beam angle and light grids in film production]
- Employ Practical Lighting: Place warm household desk lamps, Edison bulbs, or fairy lights in the background of your shot. These practical sources add depth, visual interest, and pleasant bokeh balls without requiring expensive lighting stands.
- Diffusion Sheets and Shower Curtains: If you cannot afford commercial diffusion fabrics, hanging a semi-translucent frosted shower curtain or tracing paper between a bare bulb and your subject creates an ultra-soft light source on a shoestring budget.
Leveling Up with Dedicated Domestika Studio Classes
Mastering physical hardware is only half the journey; understanding how camera lenses, framing, and light interact completes the filmmaker’s eye. If you want structured, step-by-step guidance from working directors of photography, exploring Domestika’s specialized video catalog is an exceptional next step.
When assessing the best online course platforms , Domestika stands out for its cinematic, studio-focused production quality. Taking courses dedicated to low-budget filmmaking or exploring curricula within the best Domestika video editing courses
teaches you how to stage scenes, read exposure histograms, and grade your footage to match high-end cinematic standards.
Frequently Asked Questions
What is the cheapest key light option for beginners?
A 60W bi-color continuous LED lamp paired with an inexpensive collapsible softbox runs under $100 and delivers enough output to serve as an effective key light for desk and small-room talking head setups.
Can I use ring lights for cinematic video?
Ring lights work well for flat, shadowless beauty vlogging, but they generally fail to produce the directional shadows and depth required for a cinematic look. To use one cinematically, move it 45 degrees off-axis from your camera and diffuse it heavily.
What is the ideal key-to-fill ratio for cinematic content?
A 4:1 or 8:1 key-to-fill ratio—meaning the key side of the face is two to three stops brighter than the shadow side—delivers dramatic depth without plunging the fill side into noisy, crushed shadows.
Crafting film-grade visuals does not require an industry-sized budget; it requires deliberate spatial staging and respect for shadow. Start by cutting off your overhead ceiling fixtures, angling a single diffused key light at 45 degrees, and bouncing fill with simple white foam board. Dial in your setup today, experiment with your contrast ratios, and give your video content the cinematic depth it deserves.