A mouthwatering recipe can easily fall flat online if dull lighting, awkward plating, or flat angles strip away its sensory appeal. For food bloggers, recipe developers, and restaurant marketers, taking structured food photography & styling classes turns everyday kitchen creations into high-converting editorial assets. Instead of letting warm dishes wilt while you fumble with manual exposure settings, professional guidance teaches you how to direct the viewer’s eye straight to the crispest crust or glossiest glaze.
Modern audiences eat with their eyes long before taking a bite. Mastering visual temperature, surface textures, and color balance allows you to command higher brand sponsorships and book freelance commercial gigs. The following top-rated classes break down the essential studio tricks, camera techniques, and prop arrangements required to produce gallery-grade culinary imagery.
Why Food Photography & Styling Classes Transform Culinary Portfolios
Culinary media presents technical challenges that standard tabletop photography rarely encounters. Cooked dishes change appearance rapidly under hot studio lamps: sauces coagulate, ice melts, herbs dehydrate, and steam dissipates within minutes. High-level classes show you how to stage scenes using stand-ins, map camera positions beforehand, and introduce the hero dish only when lighting and framing are locked.
Structured training also helps you bridge the gap between static recipe stills and dynamic social feeds. If you want to expand your recipe posts into interactive social content, pairing photography with dedicated instruction in content creation and editing for Instagram Stories ensures your vertical clips share the same appetizing aesthetic as your main feed.
Furthermore, culinary brands increasingly look for versatile motion assets. Discovering how to turn your ideas into videos lets you film sizzling pours, sauce drizzles, and unboxing sequences without losing control over shadow and highlight balance.
Comparing the Leading Culinary Photography & Styling Courses
| Course & Instructor | Visit Course | Primary Gear | Primary Focus | Skill Level | Final Deliverable |
|---|---|---|---|---|---|
| Styling for Instagram (Kimberly Espinel) | VISIT | Smartphone / Natural Light | Props, Color & Social Reach | Beginner | 3-Post Cohesive Recipe Story |
| The Art of Plating (Jodi Moreno) | VISIT | Any Camera / Natural Light | Dish Architecture & Garnish | Beginner–Intermediate | Plated Fine-Dining Showcase |
| Dark Mood Photography (Dácil Fernández) | VISIT | DSLR / Mirrorless + Reflector | High-Contrast Chiaroscuro | Intermediate | Moody Rustic Recipe Triptych |
| Techniques for Advertising (Alfonso Acedo) | VISIT | Studio Strobes & Photoshop | Commercial Catalog Lighting | Intermediate–Advanced | Retouched Commercial Billboard Ad |
| Business of Food Styling (Espacio Crudo) | VISIT | Studio Setup & Kitchen Props | Commercial Briefs & Pitching | All Levels | Full Production Pitch Deck |
| Visually Enhance Flavors (Marcela Lovegrove) | VISIT | Kitchen Prep Tools & Camera | Dish Preservation & Staging | Beginner | Styled Multi-Course Catalog |
| Take Dynamic Shots (Lucia Marecak) | VISIT | Fast Shutter / Continuous Light | Liquid Splashes & Movement | Intermediate | High-Speed Action Series & GIF |
| Gastronomic Creativity (Vega Hernando) | VISIT | Tabletop Setup & Overhead Rig | Graphic Patterns & Palettes | Beginner–Intermediate | Editorial Pop-Color Flat Lay |
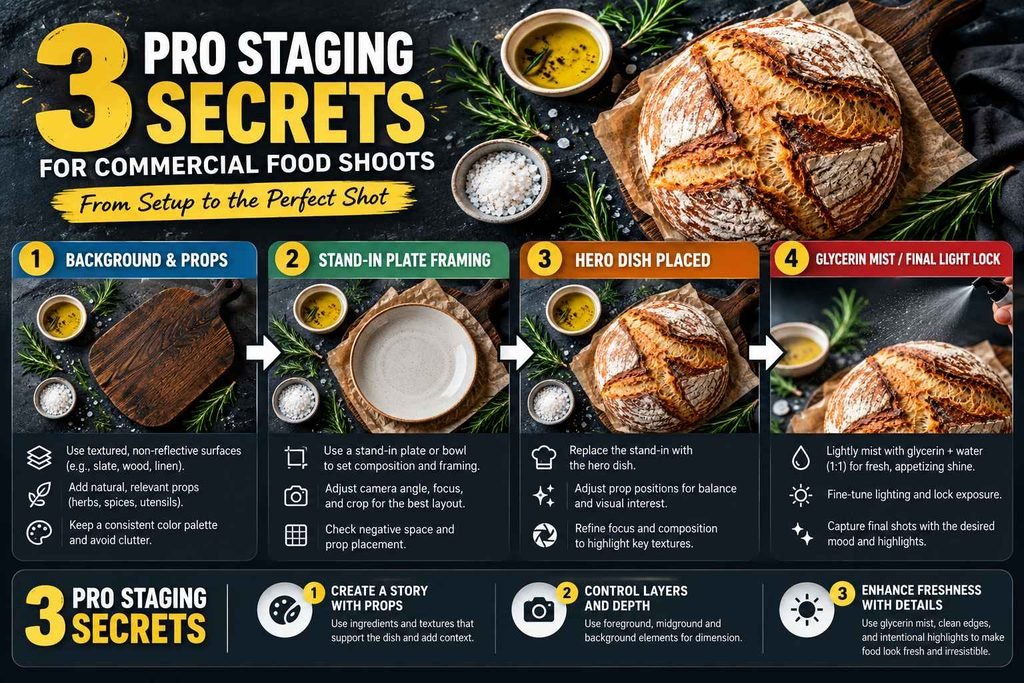
3 Pro Staging Secrets for Commercial Food Shoots
1. Master Back and Side Lighting
Lighting food directly from the front washes out textures and makes sauces look flat. Placing your key light behind or slightly to the side of the plate illuminates glistening fats, highlights individual grain textures, and makes soups and beverages appear translucent.
2. Keep Ingredients Looking Fresh with Glycerin
Water evaporates quickly under warm ambient room temperatures, causing fresh produce and salad greens to wilt within minutes. Mixing equal parts vegetable glycerin and water in a fine spray bottle creates long-lasting dew droplets that stay beaded on tomatoes, berries, and glassware throughout the shoot.
3. Build Organic Contrast with Negative Fill
Culinary photography often suffers from excessive ambient light spilling onto white plates. Placing matte black cards just outside the frame absorbs excess light bounces and carves sharp, defined shadows along the edges of bowls and ingredients, giving the dish tangible volume.
Frequently Asked Questions
Do I need a DSLR or mirrorless camera to take food photography courses?
No. Smartphone cameras paired with disciplined lighting, simple foam bounce boards, and thoughtful plating produce crisp, professional imagery for websites and social channels. Dedicated cameras offer more dynamic range, but styling and light direction matter far more than sensor size.
What is the difference between food styling and culinary photography?
Food styling involves preparing, arranging, and dressing the ingredients on the plate to ensure they look fresh and appetizing. Culinary photography focuses on camera angles, depth of field, exposure, and lighting to capture that styled plate effectively.
How do food stylists keep produce and dishes looking fresh during long shoots?
Stylists set up the lighting, camera angle, and prop layout using an empty plate or a stand-in mock dish. The actual “hero” dish is placed into the scene only when everything else is dialed in, and delicate elements are touched up with tweezers, oil brushes, and ice baths.
Build an Irresistible Culinary Portfolio Today
Transforming everyday cooking into appetizing visual stories takes deliberate staging habits, an understanding of color balance, and precise light control. Exploring creative courses across the best online course platforms gives you direct access to industry-tested plating blueprints without the cost of attending culinary school.
Pick a curriculum that matches your current equipment, pick up a bottle of glycerin and a bounce board, and start creating mouthwatering culinary imagery today.